Download and Installation
Before you begin download and installation of the SamurAI Endpoint Agent you must first select how you wish to manage SamurAI Endpoint Agent Updates and decide settings for the SamurAI Endpoint Agent for Windows.
- From the SamurAI Portal select Telemetry and click SamurAI Endpoint Agent
Upon first navigation to this page, the following will be displayed:
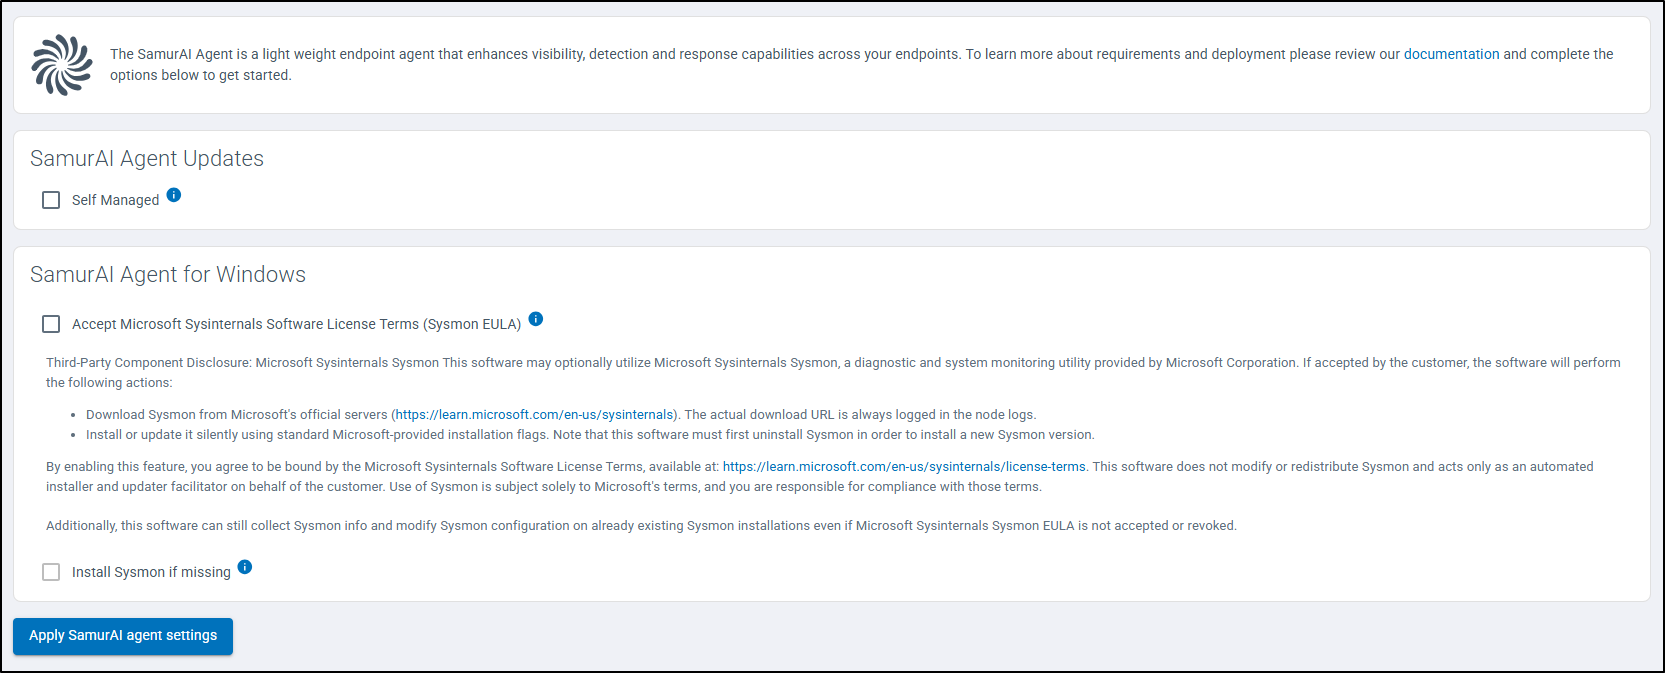
Figure 1: SamurAI Endpoint Agent settings
Updates
Select how you want to manage SamurAI Endpoint Agent updates:
- Auto Managed : Auto updates of agents is enabled by default, this option will automatically update agents as new versions are released without any action needed on your part.
- Self Managed : Select this option should you wish to manage updates yourself. See Self Managed for more information.
You can change this at any time. Refer to
Settings.
SamurAI Endpoint Agent for Windows
- Determine whether to Accept Microsoft Sysinternals Software Licence Terms (Sysmon EULA).
We recommended accepting the Sysmon EULA as this enables advanced endpoint telemetry and provides deeper visibility for threat detection and investigations. Refer to
The SamurAI Endpoint Agent and SysmonIf you accept the Sysmon EULA, you can select to Install Sysmon if missing
Click Apply SamurAI Endpoint Agent Settings
The SamurAI Endpoint Agent and Sysmon
For enhanced telemetry on Windows, the SamurAI Endpoint Agent optionally leverages Microsoft System Monitor (Sysmon), a vital component for collecting detailed process and system activity. Read more about Sysmon from Microsoft Documentation.
Sysmon is not bundled with the SamurAI Endpoint Agent therefore if you Accept Microsoft Sysinternals Software Licence Terms (Sysmon EULA) upon installation of the SamurAI Endpoint Agent, sysmon will be downloaded and installed or updated silently using standard Microsoft provided installation flags.
The SamurAI Endpoint Agent leverages a custom Sysmon configuration tuned and maintained by the SamurAI detection engineering team. This provides:
Noise reduction: a default Sysmon deployment generates an extremely high volume of data, our tuned configuration filters out unnecessary events which are irrelevant for SamurAI Managed Detection and Response.
High Fidelity detections: we selectively enable and enrich valuable event IDs (e.g process creation, network connections, registry modification etc) aligned with the MITRE ATT&CK framework.
Consistency across environments: ensures standardized event coverage across deployments.
Ongoing Tuning: we regularly update the configuration to reflect emerging attacker techniques, new ATT&CK mappings and lessons learned.
What’s Next
You can now proceed to Agent Download
1 - Download
To download the SamurAI Endpoint Agent follow the steps below:
Login go the SamurAI Portal
Click Telemetry and select SamurAI Endpoint Agent from the main menu
Click Installers
Select the relevant installer based on your operating system and click Download
When you download the SamurAI Endpoint Agent, you may notice use of the name Spiral. This is expected and an internal identifier used by the system.
The installer includes a checksum to verify the package.
Verify Download
Microsoft Windows
To ensure your download has not been corrupted or tampered with, you can validate it’s checksum using the built-in Windows tool ‘certutil’.
Run the following command and view the checksum to ensure it matches the installer within the SamurAI Portal:
c:\certutil -hashfile spiral-windows-amd64.msi sha256
example:
c:\certutil -hashfile spiral-windows-amd64.msi sha256
SHA256 hash of spiral-windows-amd64.msi:
85193aa8c4e7a1eaba1da36251bc6ea78e0e62b2
CertUtil: -hashfile command completed successfully.
What’s Next?
Based on your Operating System jump to the relevant SamurAI Endpoint Agent installation guide:
2 - Microsoft Windows
Deploy the SamurAI Endpoint Agent using your organization’s software distribution tools e.g Group Policy (GPO) active directory environment or Microsoft Intune.
When you install the SamurAI Endpoint Agent, you may notice installed components use the name Spiral - for example, the Windows installation path C:\Program Files\Spiral. These are expected internal identifiers used by the system.
Manual Installation
Locate the Windows MSI installer file that you previously downloaded and double-click, a small progress window will appear which does not require any interaction.
Additional commands are available using the command line as outlined below. All commands can be used in combination as required.
Proxy Support
If your organization leverages a proxy then use the following command during install:
Example:
msiexec.exe /i "spiral-windows-amd64.msi" PROXY=http://<ip>:<port>
This will create a key in the Windows registry: Computer\HKEY_LOCAL_MACHINE\SOFTWARE\NTT\Spiral with a parameter Proxy with the proxy from the command line.
This can be added/changed/removed at a later time, if so the SamurAI Endpoint Agent services must be restarted.
Quiet Mode Installation
Use the the following command for quiet mode installation (i.e no progress window is displayed):
msiexec.exe /i "spiral-windows-amd64.msi" /qn
Verbose Installation Logs
If you wish to view installation logs you can use the following command to save logs to a file for review:
Example:
msiexec.exe /i "spiral-windows-amd64.msi" /L*vx output.txt
Validate installation
After the installation has completed, there will be a Spiral entry under installed programs.

Figure 1: Windows apps & features
The installation folder is C:\Program Files\Spiral with full control permissions to SYSTEM and Administrators.
This should apply to all subfolders and files with one exception osquery.db which will have an additional read access to Everyone/World.

Figure 2: SamurAI Endpoint Agent Windows install path and files
There will also be a service named Spiral running.

Figure 3: Task manager service
The Spiral process will also be visible.

Figure 4: Task manager process
Additionally osquery processes will be running.

Figure 5: osquery processes
The following files are created by the installer:
C:\Program Files\Spiral\bin\spiral.exe: The Spiral launcher (more details what it does and functions further down)
C:\Program Files\Spiral\bin\osqueryd.exe: The Osqueryd binary that will be launched by spiral.exe (more details further down)
C:\Program Files\Spiral\config.yaml: The configuration for Spiral launcher
C:\Program Files\Spiral\secret: The embedded tenant/enrollment secret
C:\Program Files\Spiral\ca.pem: Spiral CA bundle used to communicate with the SamurAI platform. Will download new if missing or if outdated. Used by both spiral.exe and osqueryd.exe.
The following files are created by either the Spiral or Osquery process:
C:\Program Files\Spiral\server.crt: Exported server certificate chain from Spiral Node API (typically excluding Root CA).
C:\Program Files\Spiral\sysmon.xml: The sysmon configuration downloaded from Spiral Node API.
C:\Program Files\Spiral\data\osquery.db: RocksDB data folder used by Osquery for state keeping. Osquery sets this with read access to Everyone/World at intervals.
C:\Program Files\Spiral\data\extensions.load: Purposely left empty
C:\Program Files\Spiral\data\osquery.flags: Osquery startup flags (generated by Spiral), extended configuration is fetched by Osquery over HTTPS.
C:\Program Files\Spiral\data\osquery.log: Stdout/stderr log output from osqueryd.exe
C:\Program Files\Spiral\data\osquery.pid: Osquery PID
C:\Program Files\Spiral\data\osquery.uuid: UUID for this specific node
C:\Program Files\Spiral\data\spiral.log: Stdout/stderr log output from spiral.exe
C:\Program Files\Spiral\data\shell: A folder created if running spiral.exe with "shell" command which is an interactive mode to run Osquery commands.
Dependant on your selection for SamurAI Endpoint Agent for Windows the agent may:
- Download Sysmon from Microsoft official servers.
- Install or update Sysmon silently using standard Microsoft provided installation flags.
- Modify Sysmon with the configuration.
Review Deployed SamurAI Endpoint Agents
Review and Manage within the SamurAI Portal.