Deployment
Deployment considerations
Traffic source
The NTA is a passive device. It relies on customer infrastructure to send a copy of network traffic to the NTA monitoring interface. When deploying an NTA in a virtual environment or on Amazon EC2, consider the following requirements to achieve effective traffic monitoring and minimise performance impact.
Resource allocation
Ensure the NTA meets the recommended specifications. In some circumstances, the allocated resources may not be sufficient. We may recommend changes after the NTA is deployed and traffic throughput has been assessed.
Multi-NTA deployments
If expected network throughput exceeds the capacity of one NTA, deploy multiple NTAs to maintain coverage.
Network topology and segmentation
Map the virtual network topology and identify the optimal deployment location for the NTA. Consider both:
- East-west traffic between workloads on the same virtual switch, virtual network, or Amazon VPC.
- North-south traffic between internal and external networks, such as internet-facing web traffic.
Traffic visibility
A copy of monitored traffic must be sent to the NTA monitoring interface.
Recommended traffic sources include:
- Client-to-internet traffic.
- Client-to-client traffic.
- Client-to-server traffic.
Traffic that is typically not useful for NTA monitoring includes:
- High-volume encrypted traffic where the NTA cannot inspect the payload.
- SAN and backup traffic.
Capture traffic by configuring network mirroring or traffic monitoring for the selected deployment platform.
Virtual environments
Network mirroring on a virtual switch copies traffic from one or more source ports to a destination mirror port. Connect that destination to the NTA monitoring interface. In virtualised environments, the implementation may use port mirroring, SPAN, promiscuous mode, or a platform-specific monitoring capability.
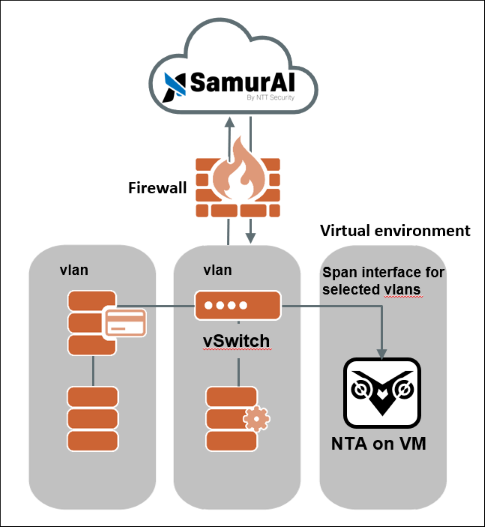
Figure 1: The NTA in a virtual environment
Amazon EC2
For Amazon EC2 deployments, use VPC Traffic Mirroring to copy traffic from an Elastic Network Interface (ENI) to the NTA monitoring interface.
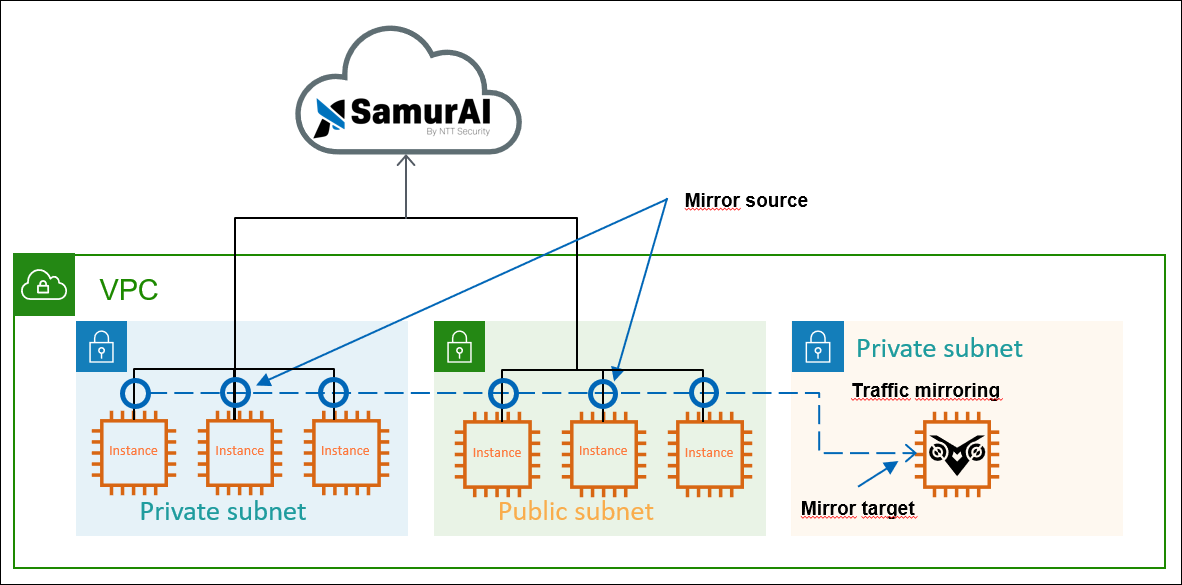
Figure 2: The NTA running on AWS
Create, configure and download an NTA
- Log in to the SamurAI Portal, select Telemetry, and then select Network Traffic Analyzer from the main menu.
- Select Create.
- Complete the fields as required.
| Field | Description |
|---|---|
| NTA name | A name for the NTA. |
| Description (Optional) | A description of the NTA. |
| Location (Optional) | Useful when you have NTAs in multiple locations. |
| Hostname | A hostname for the NTA. |
| Proxy Server address (Optional) | An optional HTTP proxy URL containing a hostname or IP address and port, for example https://192.168.1.254:8080. |
| NTP Servers (Optional) | Your NTP server IP addresses. |
| Size | Select the appropriate size based on expected monitored throughput. |
| DHCP or Static | Select DHCP, or specify a static IP address and network information. |
- Select Create NTA after completing the relevant fields.
- Select the NTA by clicking the NTA Name used in step 3.
- Select Download.
The files you download depend on the selected deployment platform.
Configuration
- ISO — NTA-specific configuration file.
- Required for all NTA deployments. Mount this ISO when the NTA starts for the first time so that it can configure and register with the SamurAI platform.
- ISO — NTA-specific configuration file.
Cloud init
- AWS — Cloud-init data for an Amazon EC2 instance.
Virtual machine
- **OVA - Virtual appliance package for VMware vSphere and Proxmox VE (includes disk images)
- VMDK — Virtual disk image for VMware vSphere manual deployment (not needed if using the OVA).
- VHDX — Virtual hard-disk image for Microsoft Hyper-V.
- **KVM bundle — — Virtual-machine package for KVM-based environments
- Download the NTA configuration ISO file and the file or files required for the selected deployment platform.
NTA installation
Select the section relevant to your deployment platform:
VMware vSphere installation
Follow the VMware documentation:
- Provide a meaningful virtual-machine name.
- Select the NTA OVA file downloaded from the SamurAI Portal. Select the appropriate E1000 or E500 variant for the target environment.
- Ensure the virtual machine is configured to use UEFI firmware.
- Configure CPU, memory, storage, and both virtual network interfaces in accordance with the recommended specifications.
After deployment, mount the NTA configuration ISO file. Refer to VMware documentation:
- Select the NTA configuration ISO file downloaded from the SamurAI Portal.
- Ensure the CD/DVD drive is connected when the virtual machine starts.
- Confirm that Network Device (net0) is connected to the management network.
- Confirm that Network Device (net1) is connected to the network or port group that receives mirrored traffic.
- Start the virtual machine.
- Continue to Deployment status.
Proxmox VE installation
Follow the Proxmox documentation:
- Create or select storage to use as the import source.
- Use the OVA/OVF import workflow to import the NTA OVA file downloaded from the SamurAI Portal. Select the appropriate E1000 or E500 variant for the target environment.
- Ensure the imported virtual machine is configured to use UEFI firmware.
- Configure CPU, memory, storage, and both virtual network interfaces in accordance with the recommended specifications.
Import the NTA configuration ISO file to Proxmox:
- Navigate to Datacenter and select Storage.
- Select the storage location where you want to store the ISO file.
- Select ISO Images.
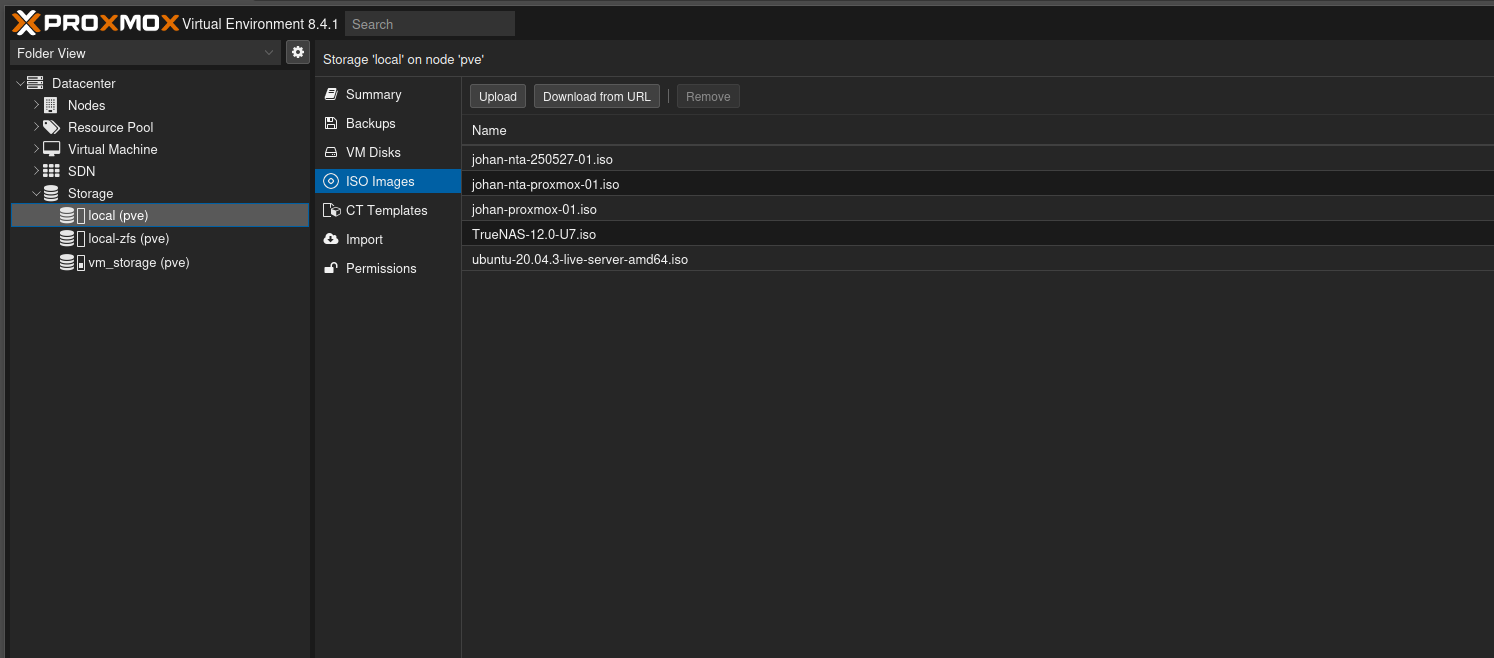
- Select Upload.
- Select the NTA configuration ISO file and upload it using the default settings.
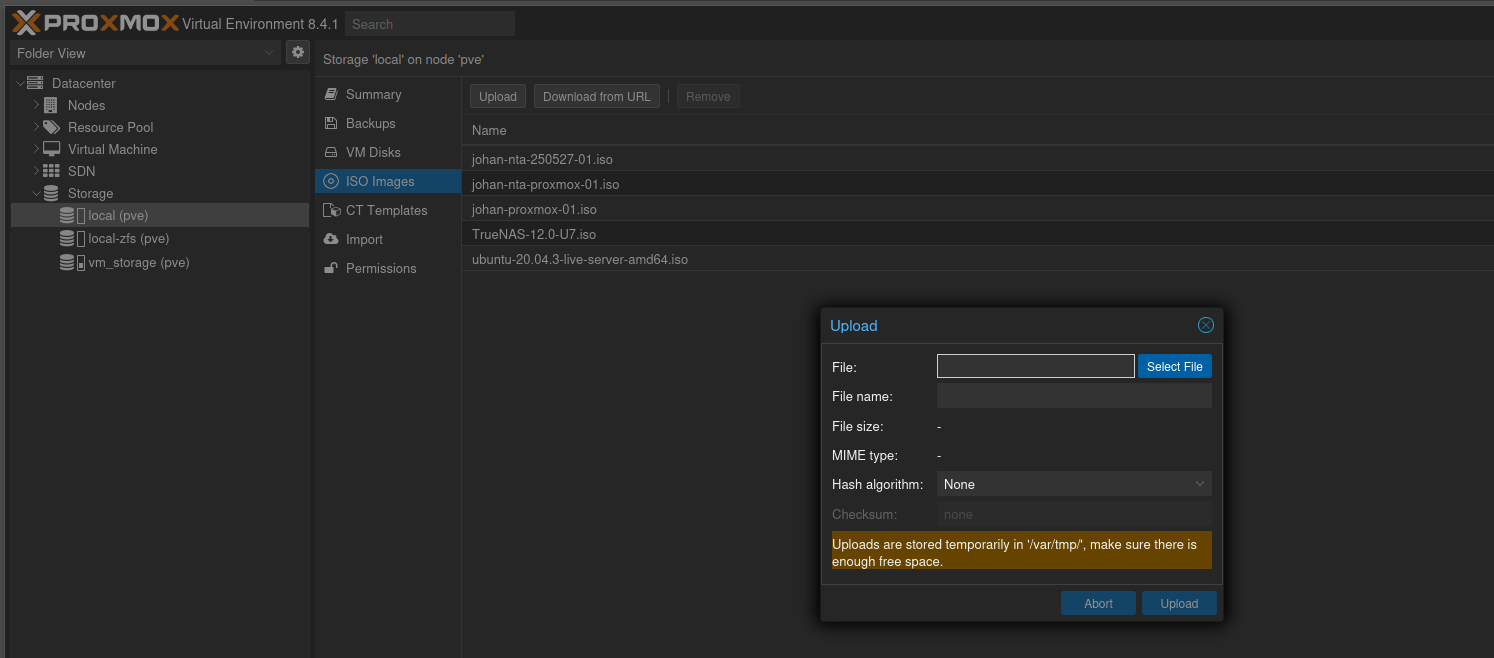
Configure the NTA virtual machine to use the configuration ISO file:
- Select the NTA virtual machine, select Hardware, and then select Add.
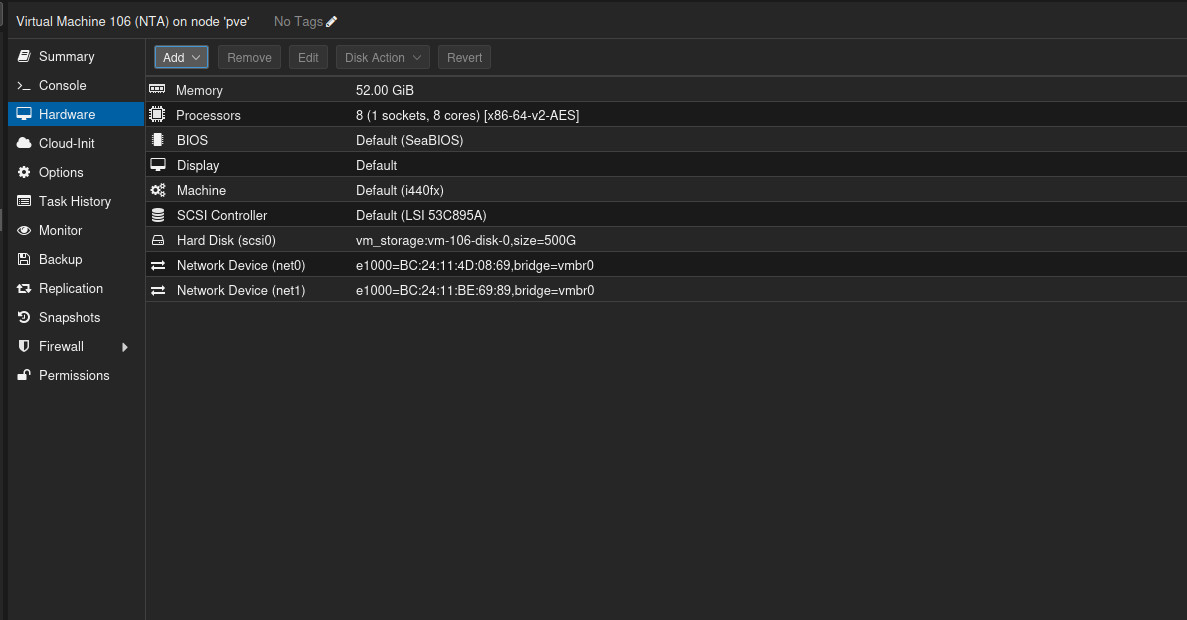
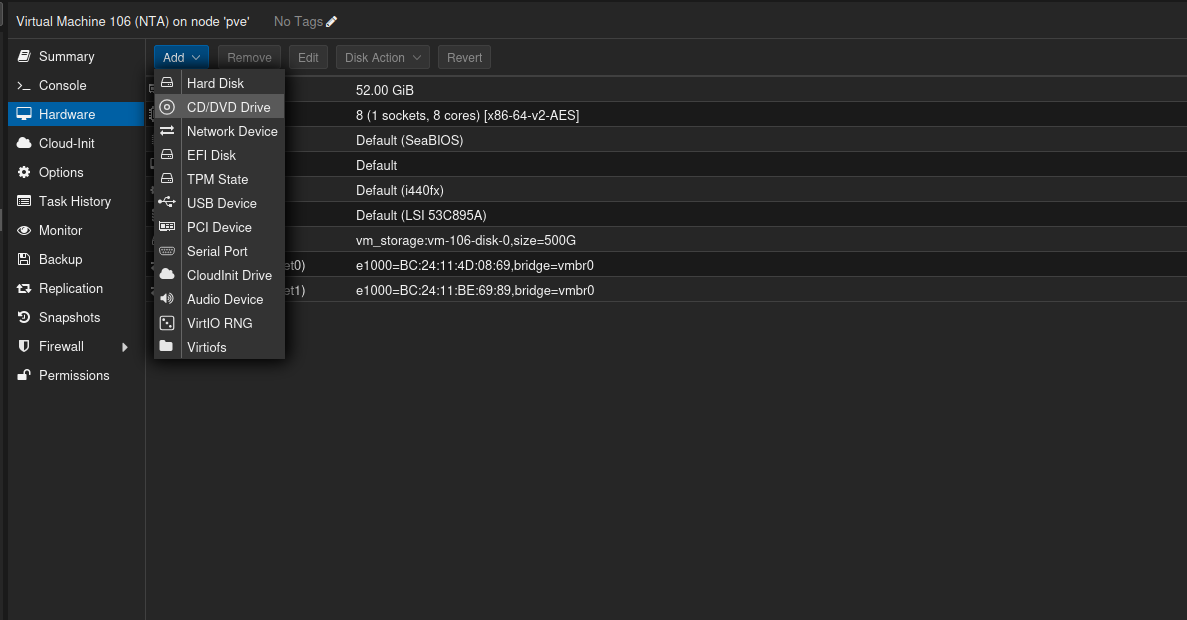
- Select CD/DVD Drive.
- Select Use CD/DVD disk image file (ISO), locate the NTA configuration ISO file, and select Add.
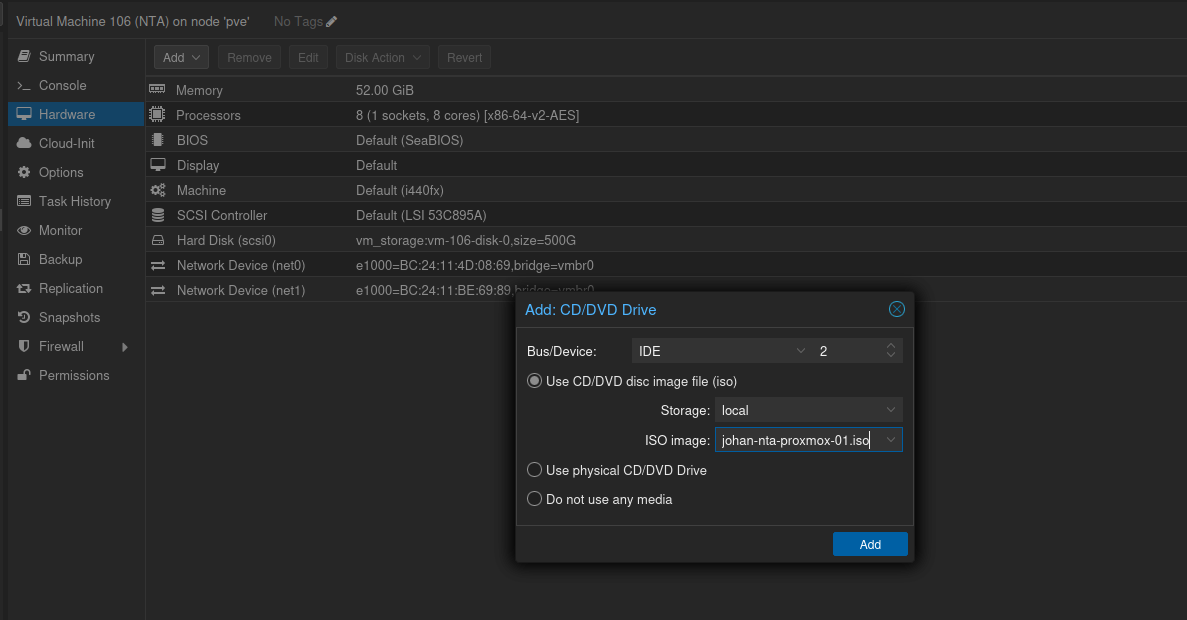
- Confirm that Network Device (net0) is connected to the management network.
- Confirm that Network Device (net1) is connected to the network or bridge that receives mirrored traffic.
- Start the virtual machine.
- Continue to Deployment status.
Microsoft Hyper-V installation
Follow Microsoft documentation:
- Provide a meaningful virtual-machine name.
- Create the NTA as a Generation 2 virtual machine.
- Configure CPU, memory, storage, and two virtual network adapters in accordance with the recommended specifications.
- When prompted to connect a virtual hard disk, select the NTA VHDX file downloaded from the SamurAI Portal.
- Attach the NTA configuration ISO file to the virtual DVD drive and ensure the drive is connected at startup.
- Connect Eth0 to the management network.
- Connect Eth1 to the virtual switch or network that receives mirrored traffic.
- Start the virtual machine.
- Continue to Deployment status.
KVM-based environments installation
This section applies to KVM environments, including platforms that use libvirt, QEMU/KVM, Open vSwitch, or another KVM management interface. The exact workflow for creating or importing a virtual machine and configuring traffic mirroring differs by KVM management platform. Follow your platform’s documentation for these actions.
Prerequisites:
- Download the NTA configuration ISO file for the NTA you created.
- Download the NTA KVM bundle.
- Extract the KVM bundle.
Use your KVM platform documentation to create or import a virtual machine from the extracted NTA image.
When creating or configuring the NTA virtual machine:
- Configure the virtual machine to use UEFI firmware.
- Configure CPU, memory, system disk, and data disk in accordance with the recommended specifications.
- Add two virtual network interfaces.
- Connect the first interface to the management network, which must allow the required outbound connectivity.
- Connect the second interface to a dedicated monitoring network, virtual switch, bridge, or port that receives mirrored traffic.
- Attach the NTA configuration ISO file as a virtual CD/DVD drive.
- Ensure the virtual CD/DVD drive is connected when the virtual machine starts for the first time.
- Start the virtual machine.
- Continue to Deployment status.
Refer to the documentation appropriate for your KVM environment:
- libvirt domain XML format
- Red Hat Enterprise Linux: Managing virtual devices
- Open vSwitch: Basic configuration and port mirroring
Amazon EC2 installation
Prerequisites:
- Download the AWS
cloud-init.yamlfile from Create, configure and download an NTA. You will use this file during EC2 instance deployment.
Follow Amazon documentation to launch an EC2 instance:
Apply the following adjustments while following the Amazon documentation:
- Select Ubuntu as the AMI.
- Select the latest supported Ubuntu 24.04 Server AMI.
- Select an instance type that meets the recommended specifications.
- Configure the key pair and network settings according to your organisation’s policies. Ensure network settings fulfil the communication requirements.
- Configure storage according to the system-disk and data-disk requirements for the selected NTA size.
- In Advanced details, paste the contents of the AWS
cloud-init.yamlfile into User data. Do not select User data has already been base64 encoded. - Complete the remaining instance configuration according to your organisation’s requirements and the Amazon documentation.
- Configure VPC Traffic Mirroring so that the selected traffic is sent to the NTA monitoring interface.
- Continue to Deployment status.
Deployment status
After deploying the NTA, view deployment progress and status in the SamurAI Portal.
- Log in to the SamurAI Portal.
- Select Telemetry, and then select Network Traffic Analyzer from the main menu.
- Select the relevant NTA.
- Under General, the Status initially displays as Provisioning.
- Review Deployment Status, which displays deployment phases and timestamps. Each completed phase is shown in green.
| No. | Deployment status message | Description |
|---|---|---|
| 1 | Initial call to backend. Network connectivity ok | The NTA has sent its first message to the SamurAI backend and enrolment has started. |
| 2 | Refreshing OS package lists | Refreshing operating-system software repository information. |
| 3 | Upgrading packages | Starting operating-system updates. |
| 4 | Finished upgrading packages | Operating-system update completed. |
| 5 | Base OS update completed | Post-update operating-system maintenance jobs completed. |
| 6 | Initiating CTS Build X | NTA installer downloaded and started. |
| 7 | Running verification to ensure minimal requirements | Installer is verifying minimum requirements and software settings. |
| 8 | Completed verification to ensure minimal requirements | Verification completed. |
| 9 | Request device_id | Requesting device identity. |
| 10 | Request init | Starting the registration process. |
| 11 | Initiator successfully contacted backend | Contacting the backend to retrieve basic operating information. |
| 12 | Downloading configuration | Downloaded configuration. |
| 13 | Logged in to dockerhub | Authorised to Docker Hub to access private containers. |
| 14 | Downloading Docker containers | Containers downloaded from Docker Hub and ready for use. |
| 15 | Storing device configuration to the backend | Sending device information to the backend. |
| 16 | Starting Manager | Starting NTA Manager. Additional software or containers may download in the background. |
- When NTA deployment is complete, Status initially displays as Not Healthy while individual components start. The status changes to Healthy when startup is complete, which can take approximately five minutes.
Configure traffic mirroring
After deployment, determine the NTA monitoring interface before configuring traffic mirroring.
- Log in to the SamurAI Portal.
- Select Telemetry, and then select Network Traffic Analyzer from the main menu.
- Select the relevant NTA.
- Select System Information and review Network to identify the Management and Monitoring interfaces. Record each MAC address and confirm that it matches the relevant hypervisor or AWS configuration.
- Configure traffic mirroring to send the required traffic to the NTA monitoring interface. Refer to your deployment platform documentation because mirroring implementations differ between environments.
Useful vendor documentation includes:
VMware vSphere
Microsoft Hyper-V
The following Microsoft documentation uses Microsoft Defender for IoT examples, but its traffic-mirroring concepts also apply to NTA deployments:
KVM-based environments
Use the traffic-mirroring capability of the KVM platform, virtual switch, bridge, or network fabric that carries the traffic you want to monitor. Examples include Open vSwitch port mirroring and platform-specific bridge or switch mirroring.
Amazon EC2
Detection testing
After deploying the NTA, validate that network traffic is monitored and analysed correctly.
The NTA includes a built-in test detection signature that triggers on ICMP Echo Request traffic with a payload size of 333 bytes. This allows you to validate end-to-end traffic visibility and detection without affecting normal operations.
Generate test traffic
Generate ICMP traffic using one of the methods below.
Windows
From Command Prompt, run:
ping -l 333 X.X.X.X
Linux
From a terminal, run:
ping -s 333 X.X.X.X
Cisco routers and switches
Use Extended Ping and specify a datagram size of 361 bytes.
The Extended Ping datagram size includes:
- IP header: 20 bytes.
- ICMP header: 8 bytes.
- ICMP payload: 333 bytes.
Total: 361 bytes.
Expected detection
After generating the test traffic, the NTA should generate the following alert:
Test Alert using ICMP size 333 for NTA validation
View this alert in the NTA Alerts panel. Refer to Alerts for more information.
- The detection is triggered by the ICMP Echo Request. A reply from the destination host is not required.
- The test signature does not affect traffic analysis or detection accuracy and is safe to use for validation.
If no alert is generated
If no alert is shown after generating the test traffic, verify the following:
- Test traffic was generated from a network segment monitored by the NTA.
- Traffic from the source network is mirrored to the NTA.
- The NTA is receiving traffic on the monitoring interface.
- The ICMP Echo Request used the correct 333-byte payload size.
- Sufficient time has been allowed for the alert to be processed and displayed.
If all checks pass and no alert is generated, submit a ticket through the SamurAI Portal.
Delete an NTA
To delete an NTA:
- In the SamurAI Portal, select Telemetry, and then select Network Traffic Analyzer.
- Select the relevant NTA.
- Select the More options icon and then select Delete NTA.
- Review the warning. To confirm the destructive action, enter
DELETEand select Delete NTA.
What’s next?
You have now deployed and configured your NTA. Refer to NTA Details.